2024/04/17: 更新
内容を更新した記事を書きましたので、よかったらこちらも併せて、ご覧ください。
こんにちは!フロントエンドエキスパートチームの@nus3_です。
kintone のフロントエンド刷新プロジェクト(フロリア)では、品質を保ったまま開発を加速させるためにフロントエンドのテストを積極的に行っています。
今回はそんなフロントエンドのテストの実装例をいくつか紹介します。この記事がフロントエンドのテストを行う上での参考になれば幸いです。
- テストに使用する主なパッケージ
- コンポーネントのテスト
- カスタムフックのテスト
- 色々なテスト事例
- 最後に
テストに使用する主なパッケージ
この記事で紹介するテストでは主に次のパッケージを使用しています。
- Jest
- JavaScript のテストフレームワーク
- Testing Library
- ユーザーの振る舞いに関するテストが書きやすくなるユーティリティ
- Mock Service Worker (MSW)
- API リクエストをインターセプトして、任意のレスポンスを返す
本記事のテストコードは全て @testing-library/user-event の v14 を使用しています。v13 と v14 では書き方が変わった部分がいくつかありますのでご注意ください。
参考: @testing-library/user-event v13 のドキュメント
https://testing-library.com/docs/ecosystem-user-event
コンポーネントのテスト
まずは、シンプルなボタンコンポーネントを例に Testing Library を使ってどのようにコンポーネントのテストを書くのか見ていきましょう。
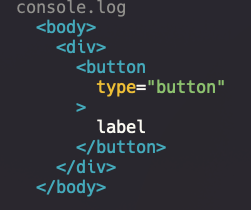
テスト対象とするコンポーネントは、ボタンのラベルに該当する children とクリック時の処理を定義する onClick の二つを props として受け取るコンポーネントです。
export type ButtonProps = {
  children: ReactNode;
  onClick: () => void;
};

export const Button: FC<ButtonProps> = ({ children, onClick }) => {
  return (
    <button type="button" onClick={onClick}>
      {children}
    </button>
  );
};
今回はボタンをクリックした際に onClick が実行されるかに焦点を当てたテストを書いていきましょう。
実際のテストコードが次になります。
import { render, screen } from "@testing-library/react";
import userEvent from "@testing-library/user-event";

import { Button } from "./Button";

describe("Button", () => {
  test("should call onClick", async () => {
    const onClickMock = jest.fn();
    render(<Button onClick={onClickMock}>label</Button>); // 1
    await userEvent.click(screen.getByRole("button")); // 2

    expect(onClickMock).toHaveBeenCalledTimes(1); // 3
  });
});
このテストコードでは次のことを行っています。
- ボタンコンポーネントを描画(
render)する - Testing Library の query を使って
<button>を取得し、クリックする - ボタンがクリックされた際に props で渡した関数が呼ばれているかを確認する
@testing-library/react の render 関数の引数にコンポーネントを渡すと、テスト上で実際に React のコンポーネントを HTML としてレンダリングしてくれます。
render 関数の実行後に screen.debug() をしてテストを実行すると、実際にテスト上で HTML としてレンダリングされているのが確認できます。
test("should call onClick", async () => {
  render(<Button onClick={onClickMock}>label</Button>);
  screen.debug();
});
上記のテストコードのようにコンポーネントテストの基本的な流れは次のようになります。
- テスト対象のコンポーネントを描画する
- 確認・操作したい要素を取得する
- 取得した要素に対してユーザー操作を行う
- 対象の要素が期待した状態になっているかを確認する
Testing Library では実際の画面上でのユーザーの振る舞い(今回であればボタンをクリックするなど)をテストすることを重点に置いて設計されています。
ユーザーの振る舞いのテストは、基本的にレンダリングされた要素が対象なので、コンポーネント内部のロジックなどの内部実装に依存しないテストを書けるのがメリットだと筆者は感じています。
また、Testing Library では、要素を取得する方法の優先順位を定めており、優先順位が高い方法を使おうと思うと自然と a11y のことを意識できるものをいい点だと思います。
参考: Testing Library の基本方針
https://testing-library.com/docs/guiding-principles/
補足: Testing Library の記法をチェックしてくれるeslint-plugin-testing-library
Testing Library でのベストプラクティスな書き方や、よくある間違いな記法のチェックに使える Testing Library 用の ESLint pluginがあります。
どういったテストの書き方が Testing Library として正しいかを、このプラグインを入れることで確認できるのでおすすめです。
参考: Common mistakes with React Testing Library
https://kentcdodds.com/blog/common-mistakes-with-react-testing-library
カスタムフックのテスト
次に、カウントを更新するシンプルな hook を例に、どのようにカスタムフックのテストを書くのか見ていきましょう。
テスト対象とする hook は、現在のカウントである count と、カウントをインクリメントする addCount を返す hook です。
import { useCallback, useState } from "react";

export const useCounter = () => {
  const [count, setCount] = useState(0);

  const addCount = useCallback(() => {
    setCount((v) => v + 1);
  }, []);

  return { count, addCount };
};
この hook では addCount が実行された際に実際にカウントがインクリメントされているかどうかのテストを書いていきましょう。
実際のテストコードが次になります。
import { act, renderHook } from "@testing-library/react";

import { useCounter } from "./useCounter";

describe("useCounter", () => {
  test("should add count", () => {
    const { result } = renderHook(() => useCounter()); // 1
    expect(result.current.count).toBe(0);

    act(() => {
      result.current.addCount(); // 2
    });
    expect(result.current.count).toBe(1); // 3
  });
});
コンポーネントのテストとは異なり、hook のレンダーには renderHook を使います。
このテストコードでは次のことを行っています。
- hook を
renderする - hook から返される
addCountを実行してカウントをインクリメントする countがインクリメントされているかを確認する
result.current.addCount() のように hook で管理している状態( count )をテストで操作する場合は、 act() で囲むことで、状態が更新され、DOM に反映されることを保証します。
上記の例のようにカスタムフックテストの基本的な流れは次のようになります。
- hook を
renderする - hook が返す関数を実行する
- hook が返す値が期待したものになっているかを確認する
参考: act()
https://ja.reactjs.org/docs/testing-recipes.html#act
補足: React v18 では @testing-library/react の renderHook を使う
React v17 までは @testing-library/react-hook の renderHook を使っていましたが、React v18 からは @testing-library/react から renderHook を import して使えるようになりました。
@testing-library/react の renderHook は @testing-library/react の v13.1.0 で追加されたものになります。React のバージョンアップと合わせて Testing Library の更新もしておきましょう。
参考リンク
- @testing-library/react v13.0.0 で React18 がサポートされた
- @testing-library/react v13.1.0 で renderHook が追加された
色々なテスト事例
ここからは実際の事例からどのようなテストを実装したかを見ていきましょう。
setTimeout を使うコンポーネントのテスト
テスト対象のコンポーネントがこちらです。
実際に setTimeout を使用している部分がこちらになります。
export const Toast: FC<ToastProps> = ({ children, onClickClose, show }) => {
  const [show, setShow] = useState(false);
  // ...
  useEffect(() => {
    // ...
    // 表示されたから一定時間後に非表示になる
    if (show) {
      window.setTimeout(() => {
        setShow(false);
      }, AUTO_CLOSE_TIME + TOAST_ANIMATION_TIME);
    }
    // ...
  }, [show]);

  return (
    <div>
      // ...
      {show && <div role="alert">{children}</div>}
    </div>
  );
};
このコンポーネントではボタンをクリックすると Toast が表示され、一定時間経過すると非表示になります。
今回は Toast が表示されてから一定時間経過後に非表示になるテストを書いていきましょう。
実際のテストコードが次になります。
import { act, render, within, screen } from "@testing-library/react";

import { userEventSetup } from "../../../test/helpers/userEventSetup";
import { AUTO_CLOSE_TIME, Toast, TOAST_ANIMATION_TIME } from "./Toast";

describe("Toast", () => {
  beforeEach(() => {
    jest.useFakeTimers();
  });

  afterEach(() => {
    jest.runOnlyPendingTimers();
    jest.useRealTimers();
  });

  test("should be show and hide toast", async () => {
    // userEventSetupについては補足で説明します
    const user = userEventSetup();

    render(<Toast>Hello nus3!</Toast>);
    expect(screen.queryByRole("alert")).toBeNull();

    await user.click(screen.getByRole("button"));
    expect(screen.getByRole("alert")).toBeInTheDocument();

    act(() => {
      jest.advanceTimersByTime(TOAST_ANIMATION_TIME + AUTO_CLOSE_TIME);
    });

    expect(screen.queryByRole("alert")).toBeNull();
  });
});
setTimeout が使われているコンポーネントのテストでは jest.useFakeTimers() を使うのがポイントです。
テスト対象が setTimeout() や setInterval() のようなタイマー関数を使うような実装の場合、そのままテストを実装すると経過時間に依存する不安定なテストになる可能性があります。
Jest ではテスト実行時に jest.useFakeTimers() を呼ぶことで、タイマー関数をモックすることができます。タイマー関数がモックされると、テストコード内で jest.advanceTimersByTime(ms) を呼んだ任意のタイミングでのみタイマーが進むようになります。
今回のテストは次の部分が該当します。
// 毎回のテスト実行前に、タイマー関数をモックする
beforeEach(() => {
  jest.useFakeTimers();
});

// 毎回のテストの実行後に通常のタイマーに戻す
afterEach(() => {
  // 保留中のタイマーを全て実行する
  jest.runOnlyPendingTimers();
  // モックから通常のタイマー関数に戻す
  jest.useRealTimers();
});

test("should be show and hide toast", async () => {
  // タイマーをTOAST_ANIMATION_TIME + AUTO_CLOSE_TIMEミリ秒進めて、
  // その経過時間中にsetTimeoutで行われる状態の更新を反映する
  act(() => {
    jest.advanceTimersByTime(TOAST_ANIMATION_TIME + AUTO_CLOSE_TIME);
  });
});
毎回テスト後に実行している jest.runOnlyPendingTimers() と jest.useRealTimers() も重要なポイントです。
jest.useRealTimers() を呼んで通常のタイマーにすることで、テスト終了後に実行されるようなサードパーティライブラリのクリーンアップ処理などをモックのタイマーで実行することを防ぎます。
また、通常のタイマーに戻す前に jest.runOnlyPendingTimers() を実行し、保留中のタイマーを全て進めることで、タイマーによる処理が他のテストに干渉するのを防ぐことができます。
実際にタイマーを進めて、Toast コンポーネントが表示から非表示に切り替わる部分を確認しているのがこちらです。
await user.click(screen.getByRole("button"));
expect(screen.getByRole("alert")).toBeInTheDocument();

act(() => {
  // Toastが自動で非表示になるまでタイマーを進める
  jest.advanceTimersByTime(TOAST_ANIMATION_TIME + AUTO_CLOSE_TIME);
});

expect(screen.queryByRole("alert")).toBeNull();
参考: Timer Mocks
https://jestjs.io/docs/timer-mocks
参考: Using Fake Timers
https://testing-library.com/docs/using-fake-timers/
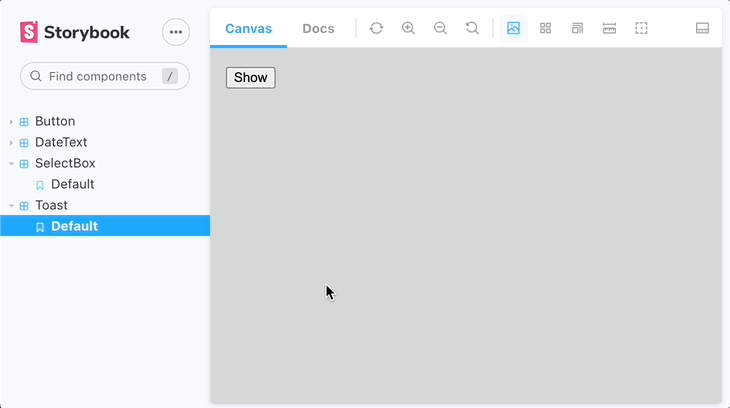
補足: Storybook の story を使ったテスト
今回のテストでは利用しませんでしたが、コンポーネントのテストには、 @storybook/testing-react を使うことで Storybook の play 関数を使用した story を利用することができます。 play 関数を使用した story を使うことで、ユーザーによるインタラクティブな操作が行われた後のコンポーネントを対象にテストを行うことができます。
実装例はこちらになります。
// Toast.stories.tsx
export const Default: ComponentStoryObj<typeof Toast> = {
  args: {
    children: "Hello nus3 in Storybook!!",
  },
  // play関数を定義することで、storyに表示されたコンポーネントに対してユーザー操作を行える
  play: ({ canvasElement }) => {
    const canvas = within(canvasElement);
    const btn = canvas.getByRole("button");
    // Toastを表示するためのボタンをクリック
    userEvent.click(btn);
  },
};

// Toast.test.tsx
import { composeStories } from "@storybook/testing-react";
import * as ToastStories from "./Toast.stories";

// storiesで定義されたDefaultのstoryを使う
const { Default } = composeStories(ToastStories);

test("should be show and hide toast in story", async () => {
  // ...
  // Defaultのstoryで定義されたplay関数を実行することで
  // play関数で定義されたユーザー操作を実行できる
  await Default.play({ canvasElement: container });
});
参考: @storybook/testing-react
https://storybook.js.org/addons/@storybook/testing-react
参考: Component Story Format 3.0
https://storybook.js.org/blog/component-story-format-3-0/
補足: userEvent の setup について
@testing-library/user-event の v14 から setup API が追加されました。これまでのように userEvent.click() のような使い方もできますが、 userEvent.setup() を使うことが推奨されています。
また、 userEvent の内部では、userEvent.type() のように一連の文字入力をする際に setTimeout が実行されます。なのでテストで useFakeTimers を使う場合は、この内部で実行されている setTimeout のタイマーも進める必要があります。
これらの変更に対応するために、setTimeout を使うコンポーネントのテストでは setup 用のヘルパー関数を作っています。
import userEvent from "@testing-library/user-event";

/**
 * helper of user-event setup
 */
export function userEventSetup(
  options: Parameters<typeof userEvent["setup"]>[0] = {}
): ReturnType<typeof userEvent["setup"]> {
  return userEvent.setup({
    // useFakeTimer時にjest.advanceTimersByTimeを使ってタイマーを進める
    advanceTimers: jest.advanceTimersByTime,
    ...options,
  });
}
このヘルパー関数を使って userEvent の setup を行なっています。
import { userEventSetup } from "../../../test/helpers/userEventSetup";

test("should be hiding animation", async () => {
  // ...
  const user = userEventSetup();

  // ...
  await user.click(closeBtn);
});
参考: @testing-library/user-event v14
https://github.com/testing-library/user-event/releases/tag/v14.0.0
参考: @testing-library/user-event Introduction
https://testing-library.com/docs/user-event/intro/
参考: @testing-library/user-event advanceTimers option
https://testing-library.com/docs/user-event/options/#advancetimers
補足: getBy queryBy findBy の違いについて
Testing Library ではテスト時にレンダリングされた要素を取得する query が提供されています。
一つの要素を取得する query には getBy, queryBy, findBy があり、複数の要素を取得する query には getAllBy, queryAllBy, findAllBy があります。
それぞれの query は取得する要素があるかどうかによって挙動が異なります。各挙動の違いは Testing Library のドキュメントに表でまとめられています。

参考: Types of Queries
https://testing-library.com/docs/queries/about/#types-of-queries
現在の日付を表示するコンポーネントのテスト
new Date() などの現在の日時を表示するようなコンポーネントのテストには jest.useFakeTimers と jest.setSystemTime が使えます。
たとえば現在の日付を2022/08/19のような形式で表示する次のようなコンポーネントの場合、
export const DateText: FC = () => {
  const date = new Date().toLocaleDateString("ja-JP", {
    year: "numeric",
    month: "2-digit",
    day: "2-digit",
  });

  return <span>{date}</span>;
};
テストコードは次のようになります。
test("should render date", () => {
  jest.useFakeTimers();
  // システムの日時を1991/08/02に変更
  jest.setSystemTime(new Date("1991/08/02").getTime());

  render(<DateText />);
  expect(screen.getByText("1991/08/02")).toBeInTheDocument();

  jest.runOnlyPendingTimers();
  jest.useRealTimers();
});
useFakeTimers を使っている場合に、 setSystemTime を実行することでシステムの日時を変更することができます。システムの日時を変更することで、上記のテストコードのようにテスト時に任意の日時を指定できるようになります。
参考: jest.setSystemTime(now?: number | Date)
https://jestjs.io/docs/jest-object#jestsetsystemtimenow-number--date
useEffect のクリーンアップを確認するテスト
useEffect で addEventListener し、クリーンアップの際に removeEventListener するような hook を例に見ていきましょう。
テスト対象の hook のコードがこちらになります。
export const useName = () => {
  const [name, setName] = useState("nus3");

  const handleClick = useCallback(() => {
    setName("nus4");
  }, []);

  useEffect(() => {
    document.addEventListener("click", handleClick);
    return () => {
      document.removeEventListener("click", handleClick);
    };
  }, [handleClick]);

  return name;
};
この hook は実行時に addEventListener が呼ばれ、 unmount 時に removeEventListener が呼ばれます。
このテストを実装すると次のようになります。
describe("useName", () => {
  test("should remove event listener when unmount", () => {
    const addEventListenerMock = jest.spyOn(document, "addEventListener");
    const removeEventListenerMock = jest.spyOn(document, "removeEventListener");

    const { unmount } = renderHook(() => useName());
    expect(addEventListenerMock).toBeCalledWith("click", expect.any(Function));

    unmount();
    expect(removeEventListenerMock).toBeCalledWith(
      "click",
      expect.any(Function)
    );
  });
});
renderHook の返り値には unmount メソッドがあり、このメソッドを実行することで hook を unmount することができます。useEffect 内で呼ばれた addEventListener と removeEventListener をあらかじめ spyOn することで、hook を render した際と unmount した場合に、それぞれが呼ばれているかを確認できます。
また、今回のテストでは expect.any() を使うことで、簡易的に addEventListener のモックに渡された第二引数の値が Function オブジェクトかどうか曖昧な比較をしています。
参考: expect.any(constructor)
https://jestjs.io/docs/expect#expectanyconstructor
window.location.hash を扱うテスト
30 seconds of code で紹介されている window.location.hash を扱う hook のテストを書きます。
この hook は window.location.hash の値と更新用の関数を返します。
テスト対象のコードがこちらです。実際のコードは次のリンクでも確認できます。
https://www.30secondsofcode.org/react/s/use-hash
import { useCallback, useEffect, useState } from "react";

export const useHash = () => {
  const [hash, setHash] = useState(() => window.location.hash);

  const hashChangeHandler = useCallback(() => {
    setHash(window.location.hash);
  }, []);

  useEffect(() => {
    window.addEventListener("hashchange", hashChangeHandler);
    return () => {
      window.removeEventListener("hashchange", hashChangeHandler);
    };
  }, [hashChangeHandler]);

  const updateHash = useCallback(
    (newHash: string) => {
      if (newHash !== hash) window.location.hash = newHash;
    },
    [hash]
  );

  return { hash, updateHash };
};
window.location.hash を直接編集した際に hook から返ってくる値が更新されているかどうかを確認するテストがこちらです。
describe("useHash", () => {
  beforeEach(() => {
    window.location.hash = "#hashMock";
  });

  test("should get url hash", async () => {
    const { result } = renderHook(() => useHash());
    expect(result.current.hash).toBe("#hashMock");

    window.location.hash = "#changedHash";

    // テストがタイムアウトになるまでhashが更新されるのを何度も確認する
    await waitFor(() => expect(result.current.hash).toBe("#changedHash"));
  });
});
今回のテストでは、 window.location.hash を直接編集した際に addEventListener で登録した hashChangeHandler が呼ばれます。この時には、まだ hook から返ってくる hash は更新されません。テスト実行時に確実に hash が更新されるのを確認するために waitFor を使います。
この waitFor は、テストがタイムアウトにならない限り、引数に渡したコールバックが期待する結果になるまで何度も実行されます。
今回のテストのように期待結果を少し待つ必要があるようなテストの場合に waitFor を使うことができます。
参考: waitFor
https://testing-library.com/docs/dom-testing-library/api-async/#waitfor
参考: Common mistakes with React Testing Library
https://kentcdodds.com/blog/common-mistakes-with-react-testing-library
キーボード操作のテスト
次の動画のように左右の矢印キーでフォーカスが移動し、Enter か Space キーを押すことでフォーカスされた要素選択するようなコンポーネントのテストを書きます。
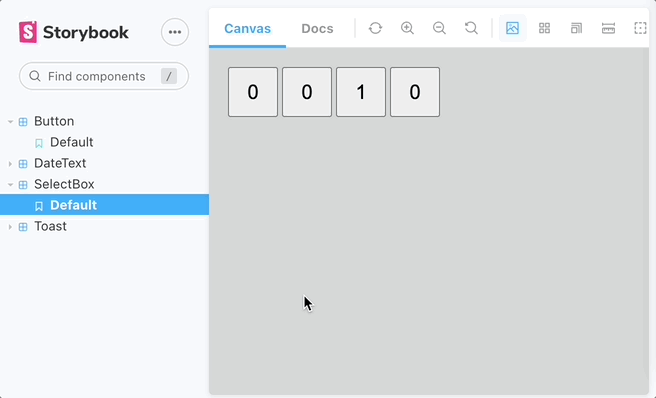
テスト対象のコンポーネントのキーボード操作の実装部分がこちらです。
const SELECT_BOX_VALUES = [0, 1, 2, 3] as const;

export const SelectBox: FC<SelectBoxProps> = ({ onClick, defaultValue }) => {
  const [selectedValue, setSelectedValue] = useState(defaultValue);
  const { focusedValue, moveFocus } = useFocus(SELECT_BOX_VALUES, defaultValue);

  return (
    <table role="grid">
      <tbody>
        <tr
          role="row"
          // 左右の矢印キーがkeyDownした時にfocusを移動する
          onKeyDown={(e) => {
            if (e.code === "ArrowRight") {
              moveFocus("positive");
            }
            if (e.code === "ArrowLeft") {
              moveFocus("negative");
            }
          }}
        >
          {SELECT_BOX_VALUES.map((value, index) => (
            <td key={value} role="gridcell">
              <SelectButton
                value={value}
                onClick={(index) => {
                  setSelectedValue(index);
                  onClick(index);
                  c;
                }}
                focused={focusedValue ? value === focusedValue : index === 0}
                selected={value === selectedValue}
              />
            </td>
          ))}
        </tr>
      </tbody>
    </table>
  );
};
まずは右矢印キーを押したらフォーカスが右に移動するテストです。
test("should focus move to right cell with right key", async () => {
  render(<SelectBox onClick={() => undefined} />);

  // boxが4つあることを確認
  const cells = screen.getAllByRole("gridcell");
  expect(cells.length).toBe(4);

  // フォーカスが左端(初期位置)にあることを確認
  const firstCellBtn = within(cells[0]).getByRole("button");
  expect(firstCellBtn).toHaveFocus();

  // 2つ目のboxにはフォーカスがないことを確認
  const secondCellBtn = within(cells[1]).getByRole("button");
  expect(secondCellBtn).not.toHaveFocus();

  // 右矢印キーを押す
  await userEvent.keyboard("{ArrowRight}");
  expect(secondCellBtn).toHaveFocus();
});
キーボード操作は userEvent.keyboard() を使うことで再現できます。
{ArrowRight} のように {} で囲うことで KeyboardEvent.key のキーを指定でき、[] で囲うことで KeyboardEvent.code のキーを指定できます。
また、> を組み合わせて使うことでキーを押し続ける操作が再現でき、\ を組み合わせることでキーを離すことが再現できます。たとえば userEvent.keyboard('{Shift>}A{/Shift}') の場合、Shift キーを押し続けている間に A キーを押し、その後 Shit キーを離す操作になります。さらに、userEvent.keyboard('{a>5}') のように > と数字を組み合わせることで、対象のキーを指定した回数分押し続けるといった操作も再現できます。
次に Enter キーとスペースキーを押した場合のテストです
test.each([
  { key: "{Enter}", keyName: "Enter" },
  { key: " ", keyName: "Space" },
])("should call onClick props when $keyName key press", async ({ key }) => {
  const onClickMock = jest.fn();
  render(<SelectBox onClick={onClickMock} />);

  // フォーカスを一番右端に移動
  await userEvent.keyboard(`{ArrowRight>3/}`);
  // test.eachで指定したkeyを押す
  await userEvent.keyboard(key);

  expect(onClickMock).toHaveBeenCalledWith(3);
});
このテストのように、同じテストケースを異なるテストデータ(今回の場合は key )を使ってテストしたい場合は test.each を使うこともできます。
参考: userEvent.keyboard()
https://testing-library.com/docs/user-event/keyboard
補足: jest-dom を使って DOM の状態を確認する
今回のテストでは、対象のフォーカスが当たっているかどうかを確認するために toHaveFocus() というメソッドを使っています。これは jest-dom で使えるマッチャーの一つです。
Jest の設定にある、setupFilesAfterEnv の中で jest-dom を import することで使用することができます。
jest-dom を利用することで DOM の状態を確認するための便利なマッチャーが利用できます。利用可能となるマッチャーは以下のリンクより確認できます。
参考: jest-dom
https://github.com/testing-library/jest-dom
Fetch API が含まれる実装のテスト
次の関数のように Fetch API が使われる実装を含むテストでは、MSW を使うと、実際のリクエストをインターセプトして、自前で定義したレスポンスを返すことができます。
type GetExamplesRequest = {
  name: string;
};

type GetExamplesResponse = {
  examples: Array<{ id: string; name: string }>;
};

export const getExamples = async (params?: GetExamplesRequest) => {
  const response = await fetch("/examples", {
    method: "GET",
    body: params && JSON.stringify({ name: params.name }),
  });
  const formattedResponse = await response.json();
  return formattedResponse as GetExamplesResponse;
};
テスト時に /examples に GET のリクエストが投げられた際に、自前で定義したレスポンスを返すように MSW を使って定義してみましょう。
import { rest } from "msw";
import { setupServer } from "msw/node";

import { getExamples, GetExamplesResponse } from "./example";

describe("/examples", () => {
  const server = setupServer();
  // MSWでリクエストをインターセプトする
  beforeAll(() => server.listen());
  beforeEach(() => {
    // REST APIをモックする。
    server.use(
      // '/examples'のGETリクエストが来た際のレスポンスを定義する
      rest.get("/examples", async (_req, res, ctx) => {
        return res(
          ctx.status(200),
          ctx.json<GetExamplesResponse>({
            examples: [
              { id: "1", name: "nus1" },
              { id: "2", name: "nus2" },
              { id: "3", name: "nus3" },
            ],
          })
        );
      })
    );
  });
  // モックしたREST APIをリセット
  afterEach(() => server.resetHandlers());
  // リクエストのインターセプトを終了
  afterAll(() => server.close());

  test("should called get examples api", async () => {
    const response = await getExamples();
    expect(response).toStrictEqual({
      examples: [
        { id: "1", name: "nus1" },
        { id: "2", name: "nus2" },
        { id: "3", name: "nus3" },
      ],
    });
  });
});
このようにテスト内で MSW を使ってリクエストのモックを定義しておくと、どのコンポーネントから API へのリクエストが呼ばれても MSW がインターセプトして、モックで定義されたレスポンスを返してくれます。
今回はテスト実行時に fetch 関数を呼び出せるように Jest の setup 時に whatwg-fetch をインポートしています。
補足: Jest のマニュアルモックについて
今回の Fetch API が使われている関数のようにテスト時に毎回、モックを定義するのが面倒な場合、Jest の Manual Mocks を使うことで、あらかじめ定義したモックを使うことができます。
モックしたいモジュールと同じ階層に __mocks__ ディレクトリを作成し、そこに同一のファイル名でモックを定義します。テスト実行時に対象のモジュールを jest.mock('./moduleName') することで、指定したモジュールを __mocks__ ディレクトリで定義されたモックと置き換えてくれます。
たとえば、以下のようなディレクトリ構成で、src/api/example.ts のモックを src/api/__mocks__/example.ts で定義すると
src/api
├── __mocks__
│   └── example.ts
└── example.ts
テスト実行前に jest.mock を呼ぶことで example.ts は __mocks__ で定義されたものに置き換わります。
jest.mock("./example");

describe("nus3", () => {
  // ...
});
なお、Jest で mock / spy を利用すると、意図せず他のテストと干渉し失敗するケースがあります。その場合は、適切なタイミングで jest.clearAllMocks() や jest.resetAllMocks() を呼び出すか、Jest の設定で clearMocks や resetMocks を有効にしてテストごとにモックをクリアすると良いでしょう。
参考: Mocking user modules
https://jestjs.io/docs/manual-mocks#mocking-user-modules
ローディングが表示されているかどうかを確認するテスト
非同期の処理を実行している間、ローディングを表示するようなコンポーネントのテストを書きます。
テスト対象のコンポーネントのコードがこちらです。
export const GetExamplesButton: FC = () => {
  const [isLoading, setIsLoading] = useState(false);
  const [examples, setExamples] = useState<GetExamplesResponse["examples"]>([]);

  const handleClick = async () => {
    try {
      setIsLoading(true);
      const res = await getExamples();
      setExamples(res.examples);
    } finally {
      setIsLoading(false);
    }
  };

  return (
    <div>
      <button type="button" onClick={handleClick}>
        Get examples
      </button>
      {isLoading ? (
        <p data-testid="Loading">Loading</p>
      ) : (
        <ul>
          {examples.map((example) => (
            <li key={example.id}>{example.name}</li>
          ))}
        </ul>
      )}
    </div>
  );
};
このコンポーネントではGet examplesというラベルのボタンをクリックした際に非同期の処理が実行され、非同期の処理が完了されるのを待つ間、Loading が表示されます。
この Loading が表示されているかどうかのテストがこちらです。
const delayedResponse = <T>(waitTime: number, response: T): Promise<T> => {
  return new Promise((resolve) => {
    setTimeout(() => {
      resolve(response);
    }, waitTime);
  });
};

test("should render loading", async () => {
  const user = userEventSetup();
  jest.useFakeTimers();

  // 非同期の処理を、500ms遅延してからレスポンスを返すようにモックする
  jest.spyOn(exampleApi, "getExamples").mockImplementation(() =>
    delayedResponse<exampleApi.GetExamplesResponse>(500, {
      examples: [
        { id: "1", name: "nus1" },
        { id: "2", name: "nus2" },
        { id: "3", name: "nus3" },
      ],
    })
  );

  render(<GetExamplesButton />);
  await user.click(screen.getByRole("button"));

  // タイマーが進んでいないのでローディングが表示される
  await waitFor(() =>
    expect(screen.getByTestId("Loading")).toBeInTheDocument()
  );
  // 非同期の処理が終わるまでタイマーを進める
  act(() => {
    jest.advanceTimersByTime(500);
  });
  // 非同期の処理が終わっているのでローディングが表示されない
  await waitFor(() => expect(screen.queryByTestId("Loading")).toBeNull());

  jest.runOnlyPendingTimers();
  jest.useFakeTimers();
});
今回のテストでは非同期の処理が実行されている間に Loading が表示されるかどうかを確認したいので、非同期の処理を mockImplementation を使って指定したミリ秒間待つ( delayedResponse )処理に置き換えます。
あとは、useFakeTimers を使ってタイマーをモックしてから Get examples ボタンをクリックすることで、テスト上で advanceTimersByTime を使ってタイマーを進めるまではローディングが表示されていることを確認することができます。
補足: jest.fn と jest.spyOn の違い
テスト対象の関数をモックするのに Jest では jest.fn と jest.spyOn が利用できます。
jest.fn を使う場合、元の関数の実装はモック関数で上書きされます。
一方で、jest.spyOn を使う場合、元の関数の実装をモック関数で上書きするだけでなく、元の実装を残したまま、対象の関数を監視することもできます。
さらに、jest.spyOn を使って関数をモックした場合は、mockRestore を使うことで元の実装を復元することができます。
テスト時に関数の元の実装を意識しなくて良い場合は jest.fn を、元の実装を残したまま監視したい場合や、テストごとにモックした関数の実装を元に戻したい場合には jest.spyOn が利用できます。
最後に
いかがでしたでしょうか。今回紹介した事例が一つでもフロントエンドのテストを書くときの参考になれば幸いです。
フロントエンドのテストに興味がある、一緒に取り組みたい方は是非、ご応募お待ちしております!
筆者が所属するフロントエンドエキスパートチームも募集しています!!