こんにちは!kintone 開発チームの Android エンジニア、トニオ(@tonionagauzzi)です。
本日は、Android 15 対応の際に発覚した、アクションバーと Edge-to-edge の組み合わせで発生するステータスバーの背景色の問題について説明します。
概要
日本時間 2024 年 10 月 16 日に、Android 15 が Pixel シリーズ向けに配信開始されました。そして同日、私が開発を担当する kintone の Android 版も、満を持して Android 15 を正式サポートしました!
Android 15 を正式サポートするには、compileSdkとtargetSdkを35に更新します。
// app:build.gradle.kts
android {
    compileSdk = 35

    defaultConfig {
        targetSdk = 35
        ...
    }
    ...
}
新しいバージョンに対応する際、SDK の変更や OS 側のふるまいの違いにより、予期せぬ問題が生じることがあります。
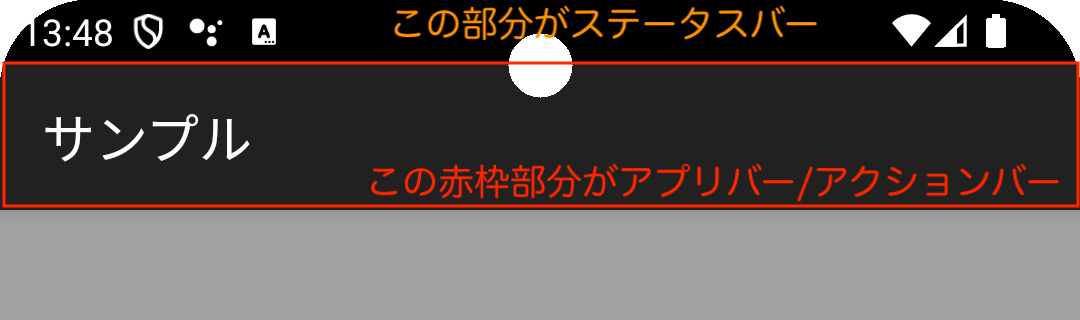
今回は、アプリバーとしてアクションバーを使っている場合にステータスバーの背景が透過されてしまい、結果として白く見えてしまう問題が見つかりました。この問題と対処法について、本記事にて紹介します。
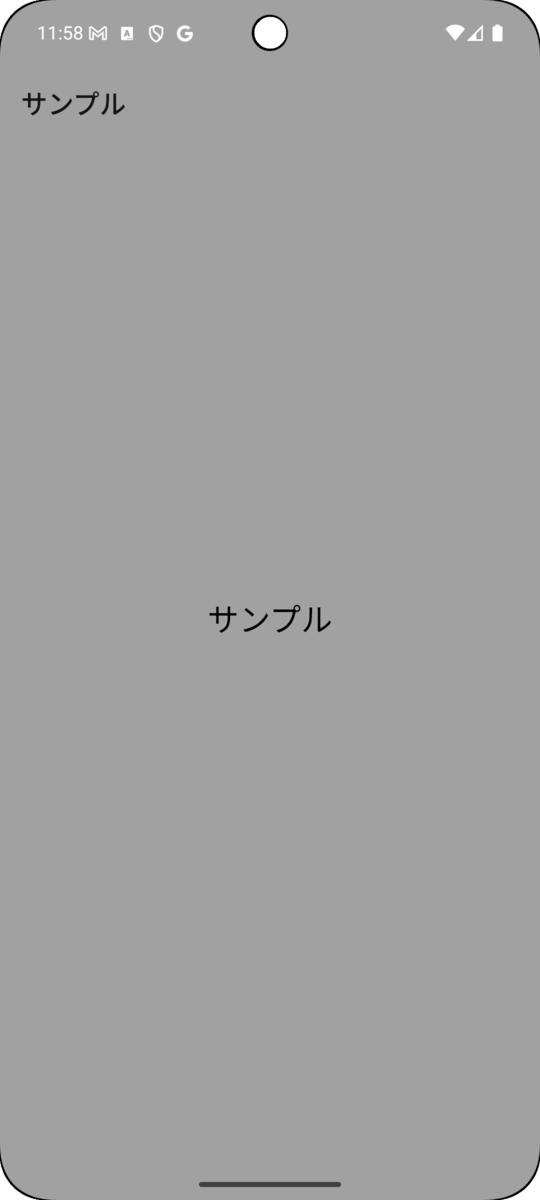
Android 14
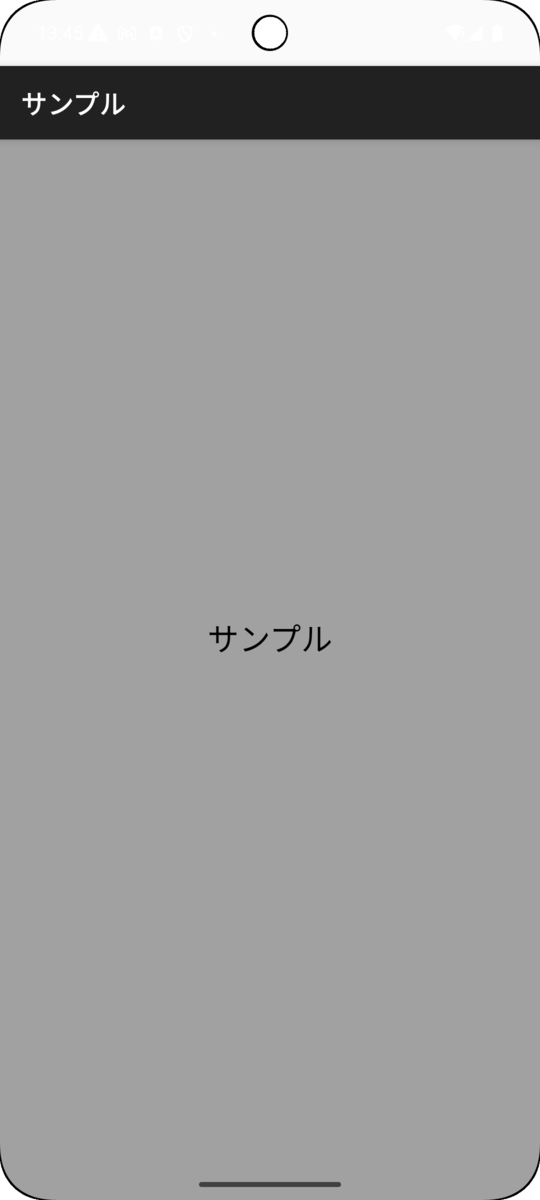
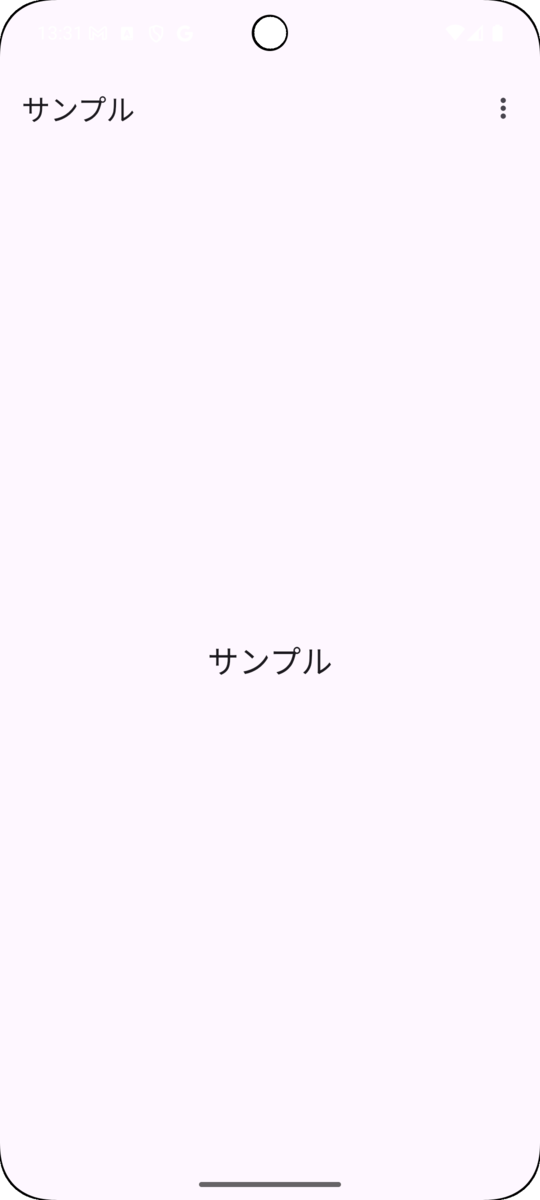
Android 15
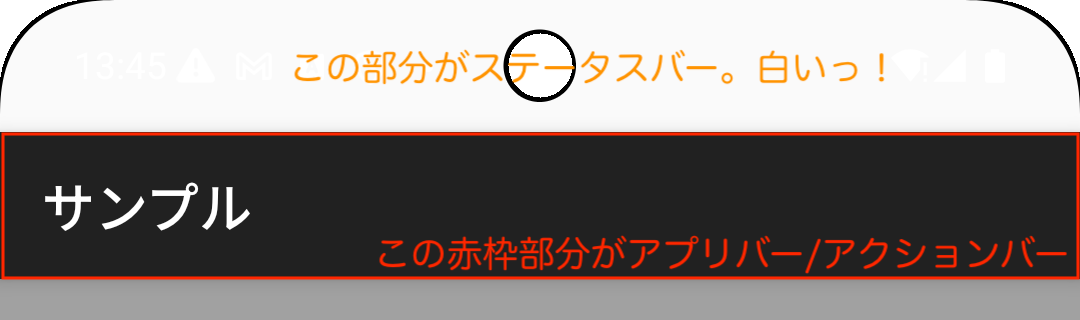
Android 15 端末でステータスバーの色が白くなってしまいます。
参考:【Bingで解説】「アクションバー」「ツールバー」「アプリバー」の違いって何? #Android - Qiita
https://qiita.com/yuki-naka/items/0ac807b7ec9d5d4e9edf
問題が起きる画面構成
以下の画像の 1 枚目が Android 14、2 枚目が Android 15 です。2 枚とも Pixel 8 で撮影しました。

この画面は、旧来の XML ベースのレイアウトで構成されており、テーマにDarkActionBarを指定することで画面上部にアクションバーを付けています。
// SampleActivity.kt
class SampleActivity : AppCompatActivity() {
    override fun onCreate(savedInstanceState: Bundle?) {
        super.onCreate(savedInstanceState)
        setContentView(R.layout.activity_sample)
    }
}
<!-- activity_sample.xml -->
<?xml version="1.0" encoding="utf-8"?>
<androidx.constraintlayout.widget.ConstraintLayout
        xmlns:android="http://schemas.android.com/apk/res/android"
        xmlns:tools="http://schemas.android.com/tools"
        android:background="#a1a1a1"
        android:layout_width="match_parent"
        android:layout_height="match_parent"
        tools:context=".view.SampleActivity">

    <androidx.appcompat.widget.AppCompatTextView
            android:layout_width="match_parent"
            android:layout_height="match_parent"
            android:text="@string/app_name_short"
            android:textColor="@android:color/black"
            android:textSize="24sp"
            android:gravity="center" />

</androidx.constraintlayout.widget.ConstraintLayout>
<!-- AndroidManifest.xml -->
<activity android:name=".view.SampleActivity"
    android:exported="true"
    android:theme="@style/Theme.AppCompat.Light.DarkActionBar">
    ...
</activity>
問題の詳細と対処法を、これから解説します。
問題の詳細
Android 15 以上でアクションバー(ActionBar もしくは SupportActionBar )を使っていると、ステータスバーの色をアプリ側から変更できなくなります。
原因は、アクションバーに自動設定される余白です。アクションバーが付いたサンプル画面を Layout Inspector で見ると、ルートの View の y 座標に 56 dp が設定されています。この余白は、アプリ開発者が意図して設定した値ではありません。アクションバーによって自動設定された値です。
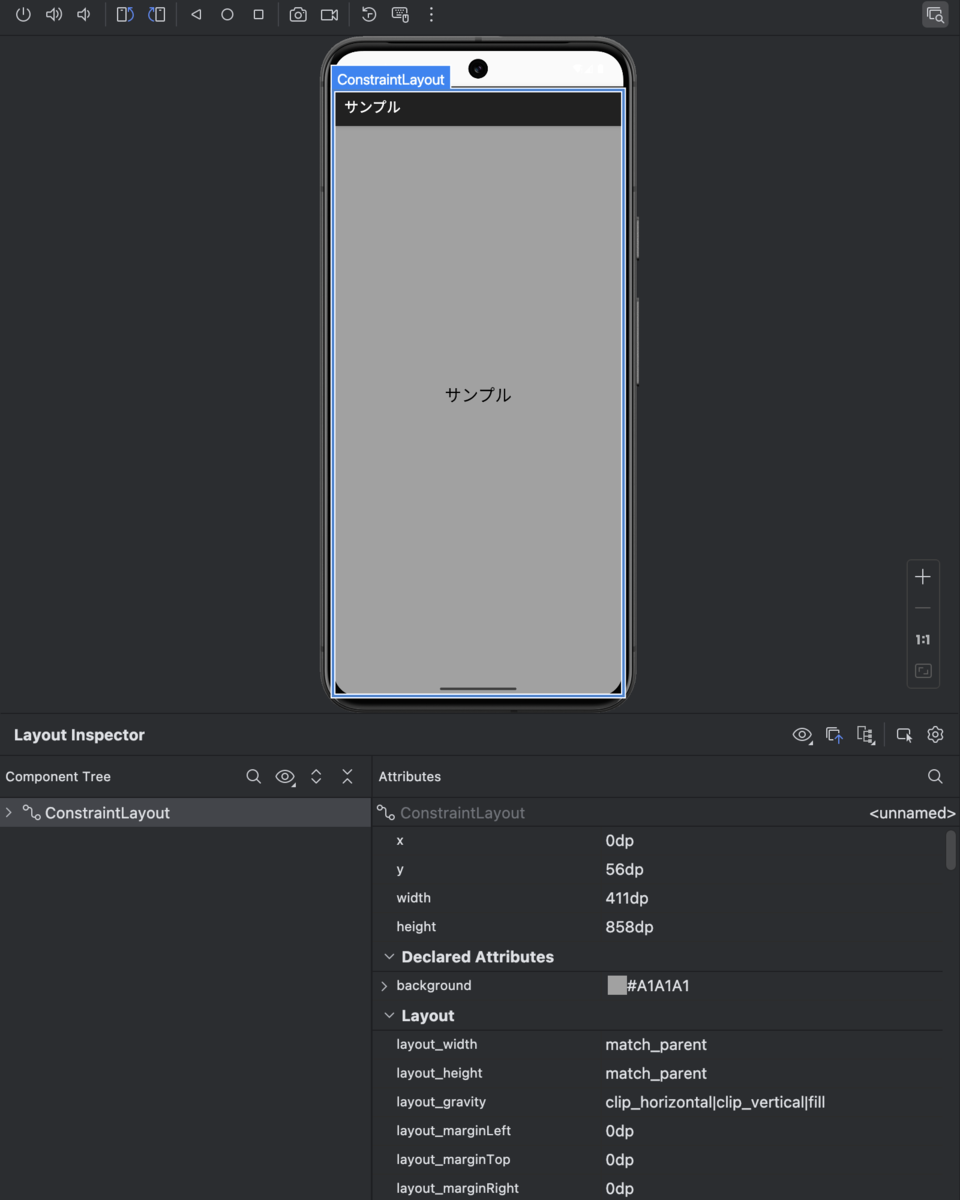
この余白は、アプリのテーマの適用範囲外です。ルートの View よりも外側にあります。Application や Activity にテーマで背景を設定しても、余白の背景色は変わりません。
これが本記事で向き合う問題で、アクションバー余白問題と呼ぶことにします。
Android 14 以前であればステータスバーには自動で色がつくので、アクションバー余白問題は起きていませんでした。しかし、Android 15 では Edge-to-edge が強制的に適用された影響でステータスバーが透過されるようになり、加えて setStatusBarColor も deprecated になってしまい何色を指定してもステータスバーは透過される挙動になりました。これがアクションバー余白問題が Android 15 以降で起きる理由です。
https://developer.android.com/reference/android/view/Window#setStatusBarColor(int)
Android 15 では、ステータスバーの背景色を変えてアクションバー余白問題に対応することはできません。そして、透過したステータスバーの下に View がないのでステータスバーが白くなるのです。
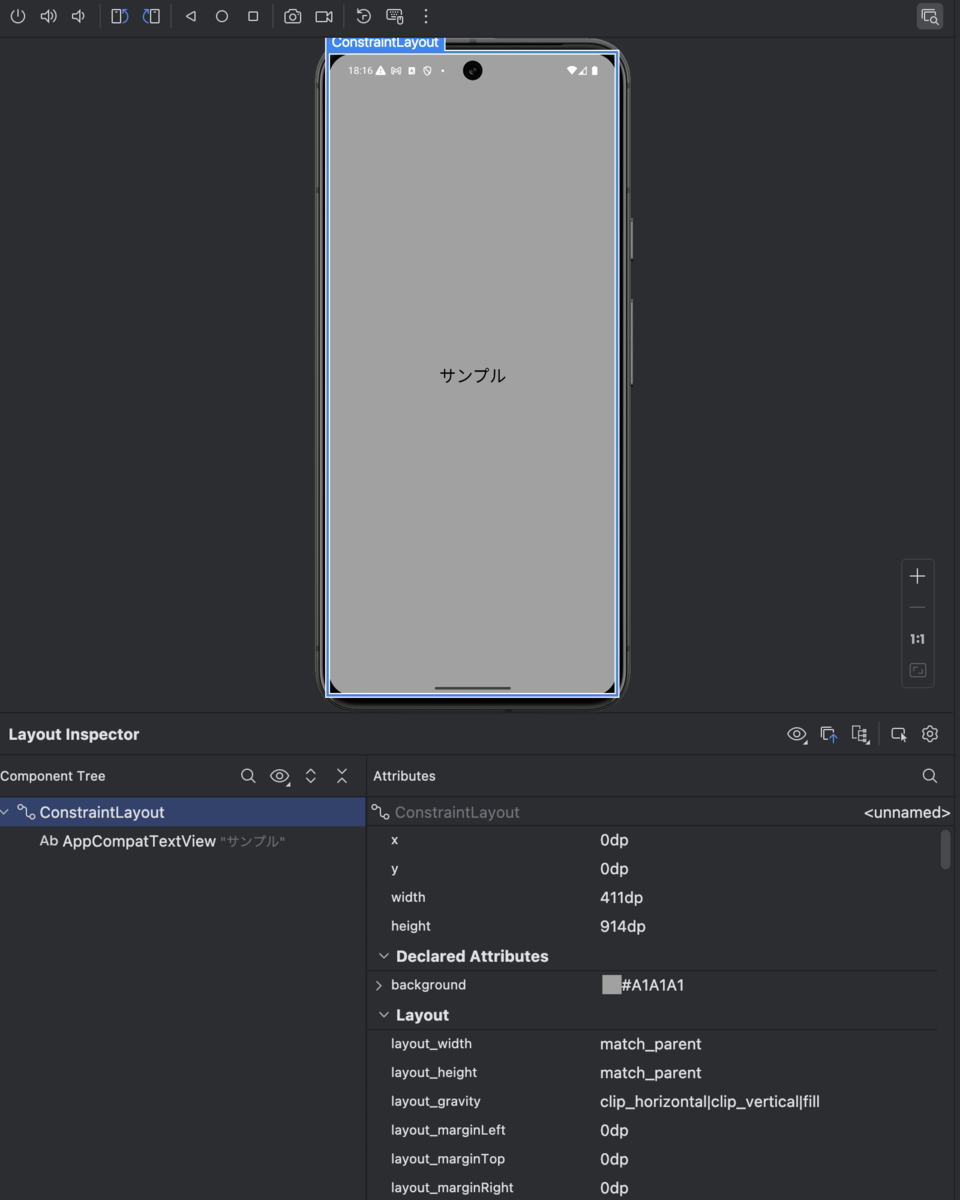
ためしにアクションバーを消してみる
アクションバーが出ていなければ、画面全体がアプリのテーマの適用範囲内になるので、ステータスバー部分の背景色を自由に設定できます。ためしに、テーマに NoActionBar を指定してアクションバーを消したサンプル画面を Layout Inspector で見ると、ルートの View の y 座標は 0 dp となっています。アクションバーが出ていなければ、アクションバー余白問題は発生しないのです。
この問題への対処法はズバリ、Edge-to-edge を無効化するか、アクションバーを消すかの二択です。
対処法
1. Edge-to-edge を無効化する
Edge-to-edge を適用しないという選択肢です。Android 15 では、Activity 単位で Edge-to-edge の適用を防ぐことができます。
<!-- styles.xml -->
<?xml version="1.0" encoding="utf-8"?>
<resources xmlns:tools="http://schemas.android.com/tools">
    <style name="Theme.AppCompat.Light.DarkActionBar.OptOutEdgeToEdge" parent="Theme.AppCompat.Light.DarkActionBar">
        <item name="android:windowOptOutEdgeToEdgeEnforcement" tools:targetApi="35">true</item>
    </style>
</resources>
<!-- AndroidManifest.xml -->
<activity android:name=".view.SampleActivity"
    android:exported="true"
    android:theme="@style/Theme.AppCompat.Light.DarkActionBar.OptOutEdgeToEdge">
    ...
</activity>
android:windowOptOutEdgeToEdgeEnforcementをtrueにすると、Android 15 端末でもこれまで通りの表示を維持できます。

ただし、公式ドキュメントにはこの方式は将来廃止される旨が書かれています。あくまで暫定対処の手段であることを留意しましょう。
https://developer.android.com/reference/android/R.attr#windowOptOutEdgeToEdgeEnforcement
If this is true, the edge-to-edge enforcement won't be applied. However, this attribute will be deprecated and disabled in a future SDK level.
2. アクションバーを消す
アクションバーを使わないという選択肢です。テーマに NoActionBar を指定するか、アクションバーを持たない ComponentActivity などを継承することで、アクションバーがなくなれば、アクションバー余白問題は発生しなくなります。
引き続きアプリバーを表示したい場合は、代わりにツールバーを表示するか、Jetpack Compose の TopAppBar を使うか、あるいはアプリバーを自作します。
ツールバーに置き換える
XML ベースのレイアウトは変えたくない場合、ツールバーで代用する方法が有効です。
<!-- activity_sample.xml -->
<?xml version="1.0" encoding="utf-8"?>
<androidx.constraintlayout.widget.ConstraintLayout
        xmlns:android="http://schemas.android.com/apk/res/android"
        xmlns:app="http://schemas.android.com/apk/res-auto"
        xmlns:tools="http://schemas.android.com/tools"
        android:background="#a1a1a1"
        android:id="@+id/root_view"
        android:layout_width="match_parent"
        android:layout_height="match_parent"
        tools:context=".view.SampleActivity">

    <androidx.appcompat.widget.Toolbar
            android:id="@+id/toolbar_sample"
            android:layout_width="match_parent"
            android:layout_height="wrap_content"
            android:minHeight="?attr/actionBarSize"
            app:layout_constraintLeft_toLeftOf="parent"
            app:layout_constraintRight_toRightOf="parent"
            app:layout_constraintTop_toTopOf="parent"/>

    <androidx.appcompat.widget.AppCompatTextView
            android:layout_width="match_parent"
            android:layout_height="match_parent"
            android:text="@string/app_name_short"
            android:textColor="@android:color/black"
            android:textSize="24sp"
            android:gravity="center"
            app:layout_constraintBottom_toBottomOf="parent"
            app:layout_constraintLeft_toLeftOf="parent"
            app:layout_constraintRight_toRightOf="parent"
            app:layout_constraintTop_toBottomOf="parent" />

</androidx.constraintlayout.widget.ConstraintLayout>
<!-- AndroidManifest.xml -->
<activity android:name=".view.SampleActivity"
    android:exported="true"
    android:theme="@style/Theme.AppCompat.Light.NoActionBar">
    ...
</activity>
// SampleActivity.kt
class SampleActivity : AppCompatActivity() {
    override fun onCreate(savedInstanceState: Bundle?) {
        super.onCreate(savedInstanceState)
        setContentView(R.layout.activity_sample)

        // Toolbar を ActionBar として表示する
        setSupportActionBar(findViewById(R.id.toolbar_sample))

        // Toolbar をステータスバーの高さぶん下へずらす
        ViewCompat.setOnApplyWindowInsetsListener(findViewById(R.id.root_view)) { view, windowInsets ->
            val insets = windowInsets.getInsets(WindowInsetsCompat.Type.systemBars())
            view.setPadding(insets.left, insets.top, insets.right, insets.bottom)
            WindowInsetsCompat.CONSUMED
        }

        // Android 14以下でもEdge-to-edgeにする(任意)
        enableEdgeToEdge(
            statusBarStyle = SystemBarStyle.dark(Color.TRANSPARENT),
            navigationBarStyle = SystemBarStyle.dark(Color.TRANSPARENT)
        )
    }
}
アプリバーに Toolbar を使うと、Android 15 端末でもこれまで通りのレイアウト配置を維持できます。しかし、ツールバーの色、メニュー、戻るボタンの実装はツールバー側で適宜行う必要があります。
TopAppBar に置き換える
XML ベースのレイアウトから Jetpack Compose に移行できるならば、Scaffold などに指定できる TopAppBar をアプリバーとして使うことができます。この場合、レイアウトのコードをロジックと同じ Kotlin 側に持たせることができ、かつコード量も減るというメリットがあります。反面、XML ベースのレイアウトから Jetpack Compose への移行がプロダクトによっては大変な規模になります。
// SampleActivity.kt
class SampleActivity : ComponentActivity() {
    @OptIn(ExperimentalMaterial3Api::class)
    override fun onCreate(savedInstanceState: Bundle?) {
        super.onCreate(savedInstanceState)

        setContent {
            val modifier = Modifier

            Scaffold(
                modifier = modifier.fillMaxSize(),
                topBar = {
                    TopAppBar(
                        actions = {
                            IconButton(onClick = {}) {
                                Box(modifier = Modifier.weight(1f)) {
                                    Icon(
                                        imageVector = Icons.Filled.MoreVert,
                                        contentDescription = "Menu"
                                    )
                                    // DropdownMenu などを配置する
                                }
                            }
                        },
                        modifier = modifier,
                        title = {
                            Text("サンプル")
                        }
                    )
                }
            ) { contentPadding ->
                Box(
                    contentAlignment = Alignment.Center,
                    modifier = modifier
                        .padding(contentPadding)
                        .fillMaxSize()
                ) {
                    Text(
                        fontSize = 24.sp,
                        text = "サンプル"
                    )
                }
            }
        }
    }
}
Jetpack Compose を使う場合は、ComponentActivity を継承することが推奨されています。
https://developer.android.com/develop/ui/compose/libraries?hl=ja
また、Material 3 デザインのandroidx.compose.material3に対応していれば、インセットを自動的に処理してくれるので、Edge-to-edge 対応が容易になります。
https://developer.android.com/develop/ui/compose/layouts/insets#material3-components
まとめ
この記事では、Android 15 で ActionBar を表示する場合に Edge-to-edge 強制有効化との兼ね合いで発生する問題について解説しました。アクションバーを廃止するとアプリバーを自作したり色やメニューの挙動などを自分で設定する必要がありますが、今のうちにちゃんと長期スパンで効果のある対応をしておきたいなら、暫定対処のオプトアウトではなく別の方法で対応するのが良いでしょう。
それ以外の Android 15 の問題には幸いなことに直面せず、無事 Android 15 のサポートを行うことができました。
今後も Android 開発で気づいた知見を積極的に発信していきたいと思います!
採用情報
私たちは「チームワークあふれる社会を創る」という理念のもと、日々チームワークを支えるソフトウェアの開発に取り組んでおり、一緒に働く Android エンジニアの仲間を募集しています!
少しでもご興味を持っていただいた方は、下記採用ページをご覧ください!