こんにちは、Necoプロジェクトのsatです。
本記事ではKubernetes(以下K8sと記載)アプリケーション(以降アプリと記載)の開発を高速化するツール、Telepresenceを紹介します。
最初に結論を書いておくと、Telepresenceは次のようなツールです。
- ローカルで動くプロセスやコンテナをk8sクラスタの中で動かせる
- 既存のDeployment内のコンテナを上記ローカルコンテナで置き換えられる
- テストやデバッグのためにいちいちコンテナイメージをレジストリにpush,そこからpull…とする必要がないので開発速度が上げられる
Telepresenceは現在Cloud Native Computing FoundationのSandBoxプロジェクトです。
Telepresence登場の背景
前節において"開発を高速化する"と書きましたが、まずはTelepresenceを使わないときの開発、デバッグはどのようになっているのかについて述べます。あるアプリがKubernetesクラスタにdeployされている状態を初期状態とすると、次のようになります。
- アプリのソースに変更を加える
- アプリのコンテナイメージを作る
- Dockerhubなどのレジストリにコンテナイメージをpushする
- deploymentの変更や
kubectl set imageなどによってアプリが変更後のコンテナイメージを使うようにする - アプリのPodを変更後のコンテナイメージを使って再起動する
このときコンテナイメージのpushからPodの再起動までにはそれなりの時間待たされるため、一回ソースを変更してからそれを動かすまでのサイクルが長くなりがちというのがK8sアプリ開発の大きな問題です。コンテナイメージのサイズが大きいほどこのサイクルは長くなります。この部分を高速化してくれるのがTelepresenceです。
次節以降はTelepresenceがどういうものなのかを実際に使いながら紹介します。
インストール方法
公式サイトの手順に従ってインストールします。Ubuntu 18.04の場合は次のコマンドを使います。
$ curl -s https://packagecloud.io/install/repositories/datawireio/telepresence/script.deb.sh | sudo bash
$ sudo apt install --no-install-recommends telepresence
サンプル1: ローカルコンテナをK8sクラスタ内で動かす
まずはTelepresenceの基本機能である、ローカルコンテナをK8sクラスタ内で動かす方法について書きます。
step 1: K8sクラスタの作成
kindを使ってK8sクラスタを作ります。ここではクラスタの作成にkindを使います。kindのインストール方法については以前紹介したkindについての記事を参照ください。
$ kind create cluster
$ export KUBECONFIG="$(kind get kubeconfig-path)"
step 2: サービスをdeploy
以下のhello.yamlというマニフェストを使ってhellow-world-web-serverというアプリをクラスタ上で動かします。
apiVersion: apps/v1
kind: Deployment
metadata:
  name: hello-world-web-server
spec:
  replicas: 1
  selector:
    matchLabels:
      app: hello-world-web-server
  template:
    metadata:
      labels:
        app: hello-world-web-server
    spec:
      containers:
      - name: hello-world-web-server
        image: quay.io/satoru_takeuchi/hello-world-web-server:0.1
        ports:
        - containerPort: 8000
---
apiVersion: v1
kind: Service
metadata:
  name: hello-world-web-server
spec:
  selector:
    app: hello-world-web-server
  ports:
  - protocol: TCP
    port: 8000
    targetPort: 8000
これはport 8000にアクセスすると"hello, world!"という文字列を返すというアプリです。
次のようにdeployした上でservice化します。
$ kubectl create -f hello.yaml
...
$ kubectl get service
NAME                     TYPE        CLUSTER-IP      EXTERNAL-IP   PORT(S)    AGE
hello-world-web-server   ClusterIP   10.109.22.168   <none>        8000/TCP   37s
kubernetes               ClusterIP   10.96.0.1       <none>        443/TCP    104m
$
ここまでで、クラスタ内部からはこのアプリにhello-world-web-serverという名前、ないし10.109.22.168によってアクセスできます。その一方でこの設定ではクラスタの外からはアクセスできません。
step 3: telepresenceによってクラスタ上でローカルプロセス/コンテナを実行
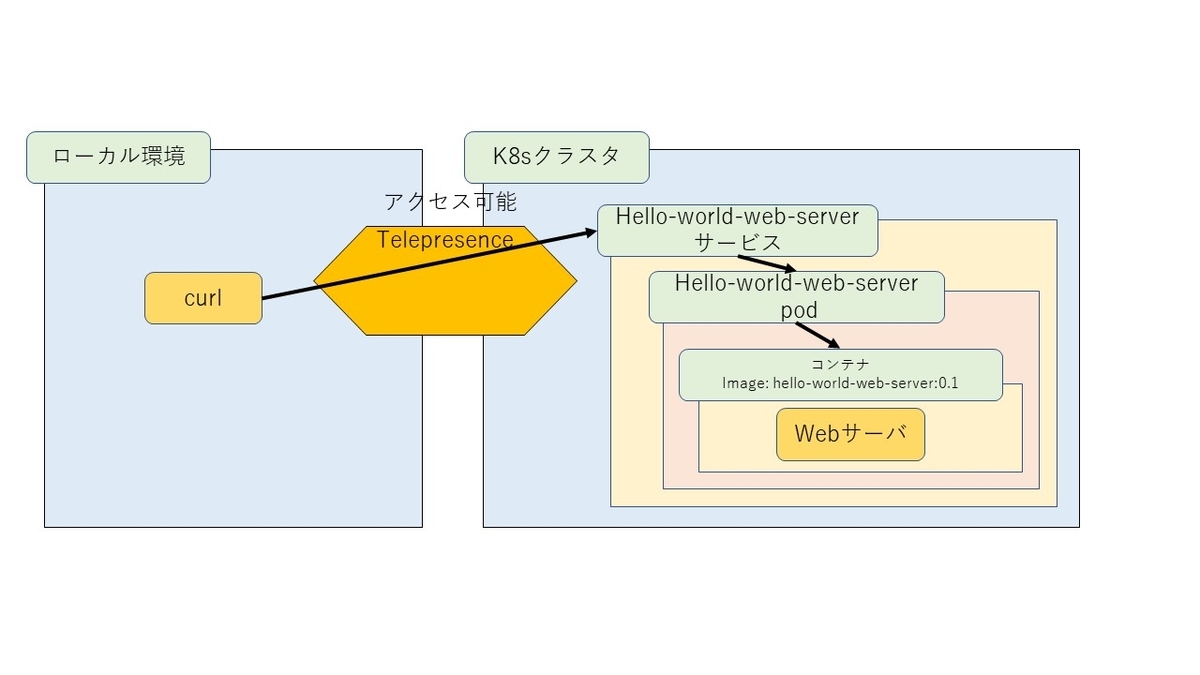
ローカルプロセスcurlからhello-world-web-serverのport 8000にアクセスしてみます。
$ curl http://hello-world-web-server:8000
curl: (6) Could not resolve host: hello-world-web-server
$
クラスタの外からのアクセスなので失敗しました。これは想定通りの動きです。

続いてTelepresenceを介して同じプロセスを動作させるとどうなるでしょうか。
$ telepresence --run curl http://hello-world-web-server:8000
T: Starting proxy with method 'vpn-tcp', which has the following limitations: All processes are affected, only one telepresence can run per machine, and you can't use other VPNs. You may need to add cloud hosts and headless services with --also-proxy. For a full list of method limitations see
T: https://telepresence.io/reference/methods.html
T: Volumes are rooted at $TELEPRESENCE_ROOT. See https://telepresence.io/howto/volumes.html for details.
T: Starting network proxy to cluster using new Deployment telepresence-1562306285-3227046-17962

T: No traffic is being forwarded from the remote Deployment to your local machine. You can use the --expose option to specify which ports you want to forward.

T: Setup complete. Launching your command.
Hello world!                         ☆ サービスにアクセスできている
T: Your process has exited.
T: Exit cleanup in progress
T: Cleaning up Deployment telepresence-1562306285-3227046-17962
アクセスが成功しました。本節冒頭で述べたようにTelepresenceによってローカル環境にあるプロセス(および後述するコンテナ)がクラスタ内にいるかのように扱えることがわかりました。

このときTelepresenceは実行ログをtelepresence.logに出力します。
同様にクラスタ内でshellを動かすこともできます。
$ telepresence --run-shell
T: Starting proxy with method 'vpn-tcp', which has the following limitations: All processes are affected, only one telepresence can run per machine, and you can't use other VPNs. You may need to add cloud hosts and headless services with --also-proxy. For a full list of method limitations see
T: https://telepresence.io/reference/methods.html
T: Volumes are rooted at $TELEPRESENCE_ROOT. See https://telepresence.io/howto/volumes.html for details.
T: Starting network proxy to cluster using new Deployment telepresence-1562306514-402358-21367

T: No traffic is being forwarded from the remote Deployment to your local machine. You can use the --expose option to specify which ports you want to forward.

T: Setup complete. Launching your command.
$ curl http://hello-world-web-server:8000
Hello world!
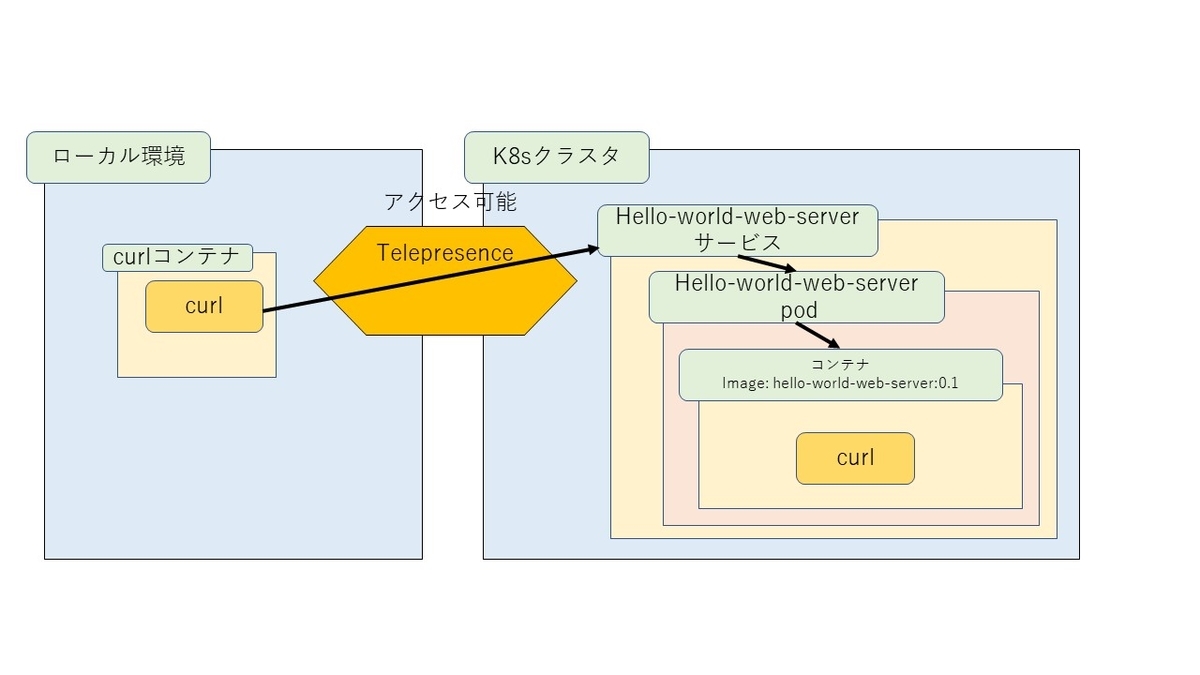
shellを含むプロセスだけではなく、クラスタ内でコンテナを動かすこともできます。
$ telepresence --docker-run -it --rm pstauffer/curl curl http://hello-world-web-server:8000
T: Volumes are rooted at $TELEPRESENCE_ROOT. See https://telepresence.io/howto/volumes.html for details.
T: Starting network proxy to cluster using new Deployment telepresence-1562306747-6756666-25541

T: No traffic is being forwarded from the remote Deployment to your local machine. You can use the --expose option to specify which ports you want to forward.

T: Setup complete. Launching your container.
Hello world!
T: Your process has exited.
T: Exit cleanup in progress
T: Cleaning up Deployment telepresence-1562306747-6756666-25541
$

サンプル2: deployment内のコンテナをローカル環境で動作するコンテナで差し替える
初期状態はサンプル1の終了時点であるとします。
通常は実行中のアプリのコンテナを差し替えるには前述のようにコンテナイメージをビルドした後に次のような手順が必要です。
- コンテナイメージをレジストリにpush
- deploymentを書き換え or
kubectl set imageによってアプリが使うコンテナを変更する - アプリのpodを再起動してコンテナをリロード
これに対してTelepresenceを使う場合はアプリが使うコンテナをローカルで動くものに差し替えられます。別のいいかたをすると上記の手順をすべて省略できます。
step 1: 変更版のコンテナをビルドする
step 1.1: ソースの準備
hello-world-web-serverコンテナのソースをダウンロードしてhello-world-web-server:0.1に相当するバージョンをチェックアウトします。
$ git clone https://github.com/satoru-takeuchi/hello-world-web-server.git
...
$ cd hello-world-web-server
$ git checkout v0.1
...
$
step 1.2: メッセージを差し替え
アプリのソースコード変更によって"Hello world!"というメッセージを"Hello telepresence!"で差し替えます。
$ cat index.html
Hello world!
$ sed -i -e s/world/Telepresence/ index.html
$ cat index.html
Hello Telepresence!
$
step 1.3: コンテナイメージをビルド
次のようにコンテナイメージをビルドします。
$ docker build -t hello-world-web-server:dev .
...
Successfully tagged hello-world-web-server:dev
...
$
step 2: アプリ内のコンテナをローカルのものと差し替える
次のようなコマンドを発行します。
$ telepresence --swap-deployment hello-world-web-server --docker-run --rm -it hello-world-web-server:dev
T: Volumes are rooted at $TELEPRESENCE_ROOT. See https://telepresence.io/howto/volumes.html for details.
T: Starting network proxy to cluster by swapping out Deployment hello-world-web-server with a proxy
T: Forwarding remote port 8000 to local port 8000.

T: Setup complete. Launching your container.
Serving HTTP on 0.0.0.0 port 8000 (http://0.0.0.0:8000/) ...
...
この後、別端末でk8sクラスタ内からhello worldサービスにアクセスすると差し替え後のコンテナを使っているのがわかります。
$ export KUBECONFIG="$(kind get kubeconfig-path)"
$ kubectl run access-hello-world-web-server -it --rm --image=pstauffer/curl --restart=Never -- curl http://hello-world-web-server:8000
Hello Telepresence!                           ☆ メッセージが変更されている
pod "access-hello-world-web-server" deleted
$
下図において、通常は点線の矢印のようにアクセスするはずですが、Telepresenceによって実線の矢印のようにアクセスするようになります。

最後に環境を綺麗にしておきましょう。
$ kubectl delete -f hello.yaml
サンプル3: 複数コンテナから成るdeployment内のコンテナの差し替え
サンプル2の最後の状態で次に示すmulti-container.yamlというマニフェストを読み込みます。このDeploymentの中にはhello.yamlの場合に加えてsleepし続けるdummyというコンテナが存在します。
apiVersion: apps/v1
kind: Deployment
metadata:
  name: hello-world-web-server
spec:
  replicas: 1
  selector:
    matchLabels:
      app: hello-world-web-server
  template:
    metadata:
      labels:
        app: hello-world-web-server
    spec:
      containers:
      - name: hello-world-web-server
        image: quay.io/satoru_takeuchi/hello-world-web-server:0.1
        ports:
        - containerPort: 8000
      containers:
       - name: dummy
         image: quay.io/satoru_takeuchi/hello-world-web-server:0.1
         command: ["/bin/sh"]
         args: ["-c", "while sleep 1000 ; do : ; done"]
---
apiVersion: v1
kind: Service
metadata:
  name: hello-world-web-server
spec:
  selector:
    app: hello-world-web-server
  ports:
  - protocol: TCP
    port: 8000
    targetPort: 8000
Telepresenceはコンテナを特定するためにdeployemt名を指定する際に<deployment名>:<コンテナ名>という書き方ができます。
$ kubectl create -f multi-container.yaml
...
$ telepresence --swap-deployment hello-world-web-server:hello-world-web-server --docker-run --rm -it hello-world-web-server:dev
...
Serving HTTP on 0.0.0.0 port 8000 (http://0.0.0.0:8000/) ...
ここで別端末からhello-world-web-serverにアクセスすると変更後のコンテナが見えます。
$ kubectl run access-hello-world-web-server -it --rm --image=pstauffer/curl --restart=Never -- curl http://hello-world-web-server:8000
Hello Telepresence!                    ☆ メッセージが変わっている
pod "access-hello-world-web-server" deleted
最後に環境を綺麗にしておきます。
$ kubectl delete -f multi-container.yaml
おわりに
弊社におけるTelepresenceを用例を一つ紹介しておきます。弊社には日本国内のインフラ基盤を刷新するNecoプロジェクトとは別に、US向けのインフラ基盤を刷新するYakumoというプロジェクトもあります。こちらでもTelepresenceがすでに活発に使われています。
Yakumoで提供されるkintoneは国内のデータセンターで提供されていたkintoneと構成が異なるため、AWS移行と同時にkintoneのテストケースの修正も発生します。Yakumo上でのkintoneのテストはKubernetes Jobとして実行しています。このテストのテストケース数は数千にも及ぶので、テストを修正する度にJobをデプロイしてると確認に時間がかかります。そこでYakumoチームではTelepresenceを使って特定のテストケースだけをローカル環境で実行することによって、待ち時間を大幅に削減できています。
Necoプロジェクトにおいても開発が進むにしたがってk8sアプリのサイズが多く、かつ、それぞれのサイズ大きくなってきたことにより、今後ますますTelepresenceを使う場面が増えていく見込みです。
最後になりますが、K8sアプリの開発において本記事で述べたような問題をかかえているみなさまは、ぜひTelepresenceを試していただきたいとおもいます。